使用 KubeKey 部署和运维 Kubernetes 和 KubeSphere 集群
第一章:KubeKey 介绍
1.1 kubeadm 等工具的缺点
- ① 需要选择合适的部署工具(包括容器运行时,如:Docker 、Podman 等)。
- ② 需要手动管理证书。
- ③ 需要为 api-server 配置负载均衡器。
- ④ 需要手动外置并备份 etcd 服务。
- ⑤ 跨区域非常麻烦。
- ⑥ 需要持续管理集群,如:手动增删节点等。
- ⑦ ……
1.2 KubeKey 介绍
- KubeKey 是一种全新的安装工具,是由 Go 语言开发的,提供了灵活的安全选择:
- all-in-one 集群。
- 高可用集群。
- 从安装结果上来看,可以选择:
- 仅安装 Kubernetes/K3s 。
- 同时安装 Kubernetes/K3s 和 KubeSpere 。
1.3 KubeKey 的使用方式
1.3.1 概述
- KubeKey 分为 all-in-one 模式和高级模式,其中高级模式可以部署高可用的 Kubernetes 集群。
1.3.2 all-in-one 模式(适合学习、测试使用)
- 对于 Kubernetes >= 1.18 版本而言,建议安装如下依赖:
# 该命令只能在 redhat 系列的系统上运行
yum -y install dnf \
    && dnf -y update \
    && dnf -y install socat conntrack ebtables ipset ipvsadm
注意:对于 CentOS 7.9 而言,最低要求 2 核 CPU,4 GB 内存,40 GB 磁盘空间。


- 学习阶段请关闭防火墙:

- 升级内核到主线版本:
# 在 CentOS 7.x 上启用 ELRepo 仓库
rpm --import https://www.elrepo.org/RPM-GPG-KEY-elrepo.org
rpm -Uvh https://www.elrepo.org/elrepo-release-7.0-4.el7.elrepo.noarch.rpm
# 安装长期支持内核版本
dnf -y --enablerepo=elrepo-kernel install kernel-lt
# 查看启动项
cat /etc/default/grub
# 修改配置
sed -i 's/^GRUB_DEFAULT=saved$/GRUB_DEFAULT=0/' /etc/default/grub
# 查看启动项
cat /etc/default/grub
# 重新创建内核配置
grub2-mkconfig -o /boot/grub2/grub.cfg
# 重启
reboot
# 查看当前系统的内核
uname -sr

- 关闭 swap 分区和 SELinux :
# 查看 SELinux 是否开启
getenforce
# 查看 SELinux 是否开启
cat /etc/selinux/config
# 永久关闭 SELinux ,需要重启
sed -i 's/enforcing/disabled/' /etc/selinux/config
# 关闭当前会话的 SELinux ,重启之后无效
setenforce 0
# 查看 SELinux 是否开启
cat /etc/selinux/config
# 查看 swap 分区是否存在
free -h
# 关闭当前会话的 swap ,重启之后无效
swapoff -a
# 永久关闭 swap ,需要重启
sed -ri 's/.*swap.*/#&/' /etc/fstab
# 查看 swap 分区是否存在
free -h


- 下载 KubeKey:
# 先执行以下命令以确保从正确的区域下载 KubeKey
export KKZONE=cn
# 执行以下命令下载 KubeKey
curl -sfL https://get-kk.kubesphere.io | VERSION=v3.0.2 sh -
# 为 kk 添加可执行权限
chmod +x kk

- 创建集群:

- 查询安装进度:
kubectl logs -n kubesphere-system $(kubectl get pod -n kubesphere-system -l 'app in (ks-install, ks-installer)' -o jsonpath='{.items[0].metadata.name}') -f

- 升级集群:

- 删除集群:

1.3.3 高级模式(生产建议使用)
- 准备工作(所有机器节点均需执行):
# 该命令只能在 redhat 系列的系统上运行
yum -y install dnf \
    && dnf -y update \
    && dnf -y install socat conntrack ebtables ipset ipvsadm
# 在 CentOS 7.x 上启用 ELRepo 仓库
rpm --import https://www.elrepo.org/RPM-GPG-KEY-elrepo.org
rpm -Uvh https://www.elrepo.org/elrepo-release-7.0-4.el7.elrepo.noarch.rpm
# 安装长期支持内核版本
dnf -y --enablerepo=elrepo-kernel install kernel-lt
# 查看启动项
cat /etc/default/grub
# 修改配置
sed -i 's/^GRUB_DEFAULT=saved$/GRUB_DEFAULT=0/' /etc/default/grub
# 查看启动项
cat /etc/default/grub
# 重新创建内核配置
grub2-mkconfig -o /boot/grub2/grub.cfg
# 重启
reboot
# 查看当前系统的内核
uname -sr
# 查看 SELinux 是否开启
getenforce
# 查看 SELinux 是否开启
cat /etc/selinux/config
# 永久关闭 SELinux ,需要重启
sed -i 's/enforcing/disabled/' /etc/selinux/config
# 关闭当前会话的 SELinux ,重启之后无效
setenforce 0
# 查看 SELinux 是否开启
cat /etc/selinux/config
# 查看 swap 分区是否存在
free -h
# 关闭当前会话的 swap ,重启之后无效
swapoff -a
# 永久关闭 swap ,需要重启
sed -ri 's/.*swap.*/#&/' /etc/fstab
# 查看 swap 分区是否存在
free -h
- 下载 KubeKey :
# 先执行以下命令以确保从正确的区域下载 KubeKey
export KKZONE=cn
# 执行以下命令下载 KubeKey
curl -sfL https://get-kk.kubesphere.io | VERSION=v3.0.2 sh -
# 为 kk 添加可执行权限
chmod +x kk
- 创建 KubeKey 的配置文件:
注意:根据实际情况,编辑 config.yaml 中的节点的配置信息。
- 安装集群依赖组件:
- 创建集群:
- 删除集群:
- 升级集群:
第二章:部署高可用的 Kubernetes 集群
2.1 概述
- Kubernetes 高可用集群有两种:
- ① 外部负载均衡。
- ② 内部负载均衡。
- 其中,
外部负载均衡的方式就是通过负载均衡器监听默认端口 6443 作为 Kubernetes API 服务器。

- 其中,
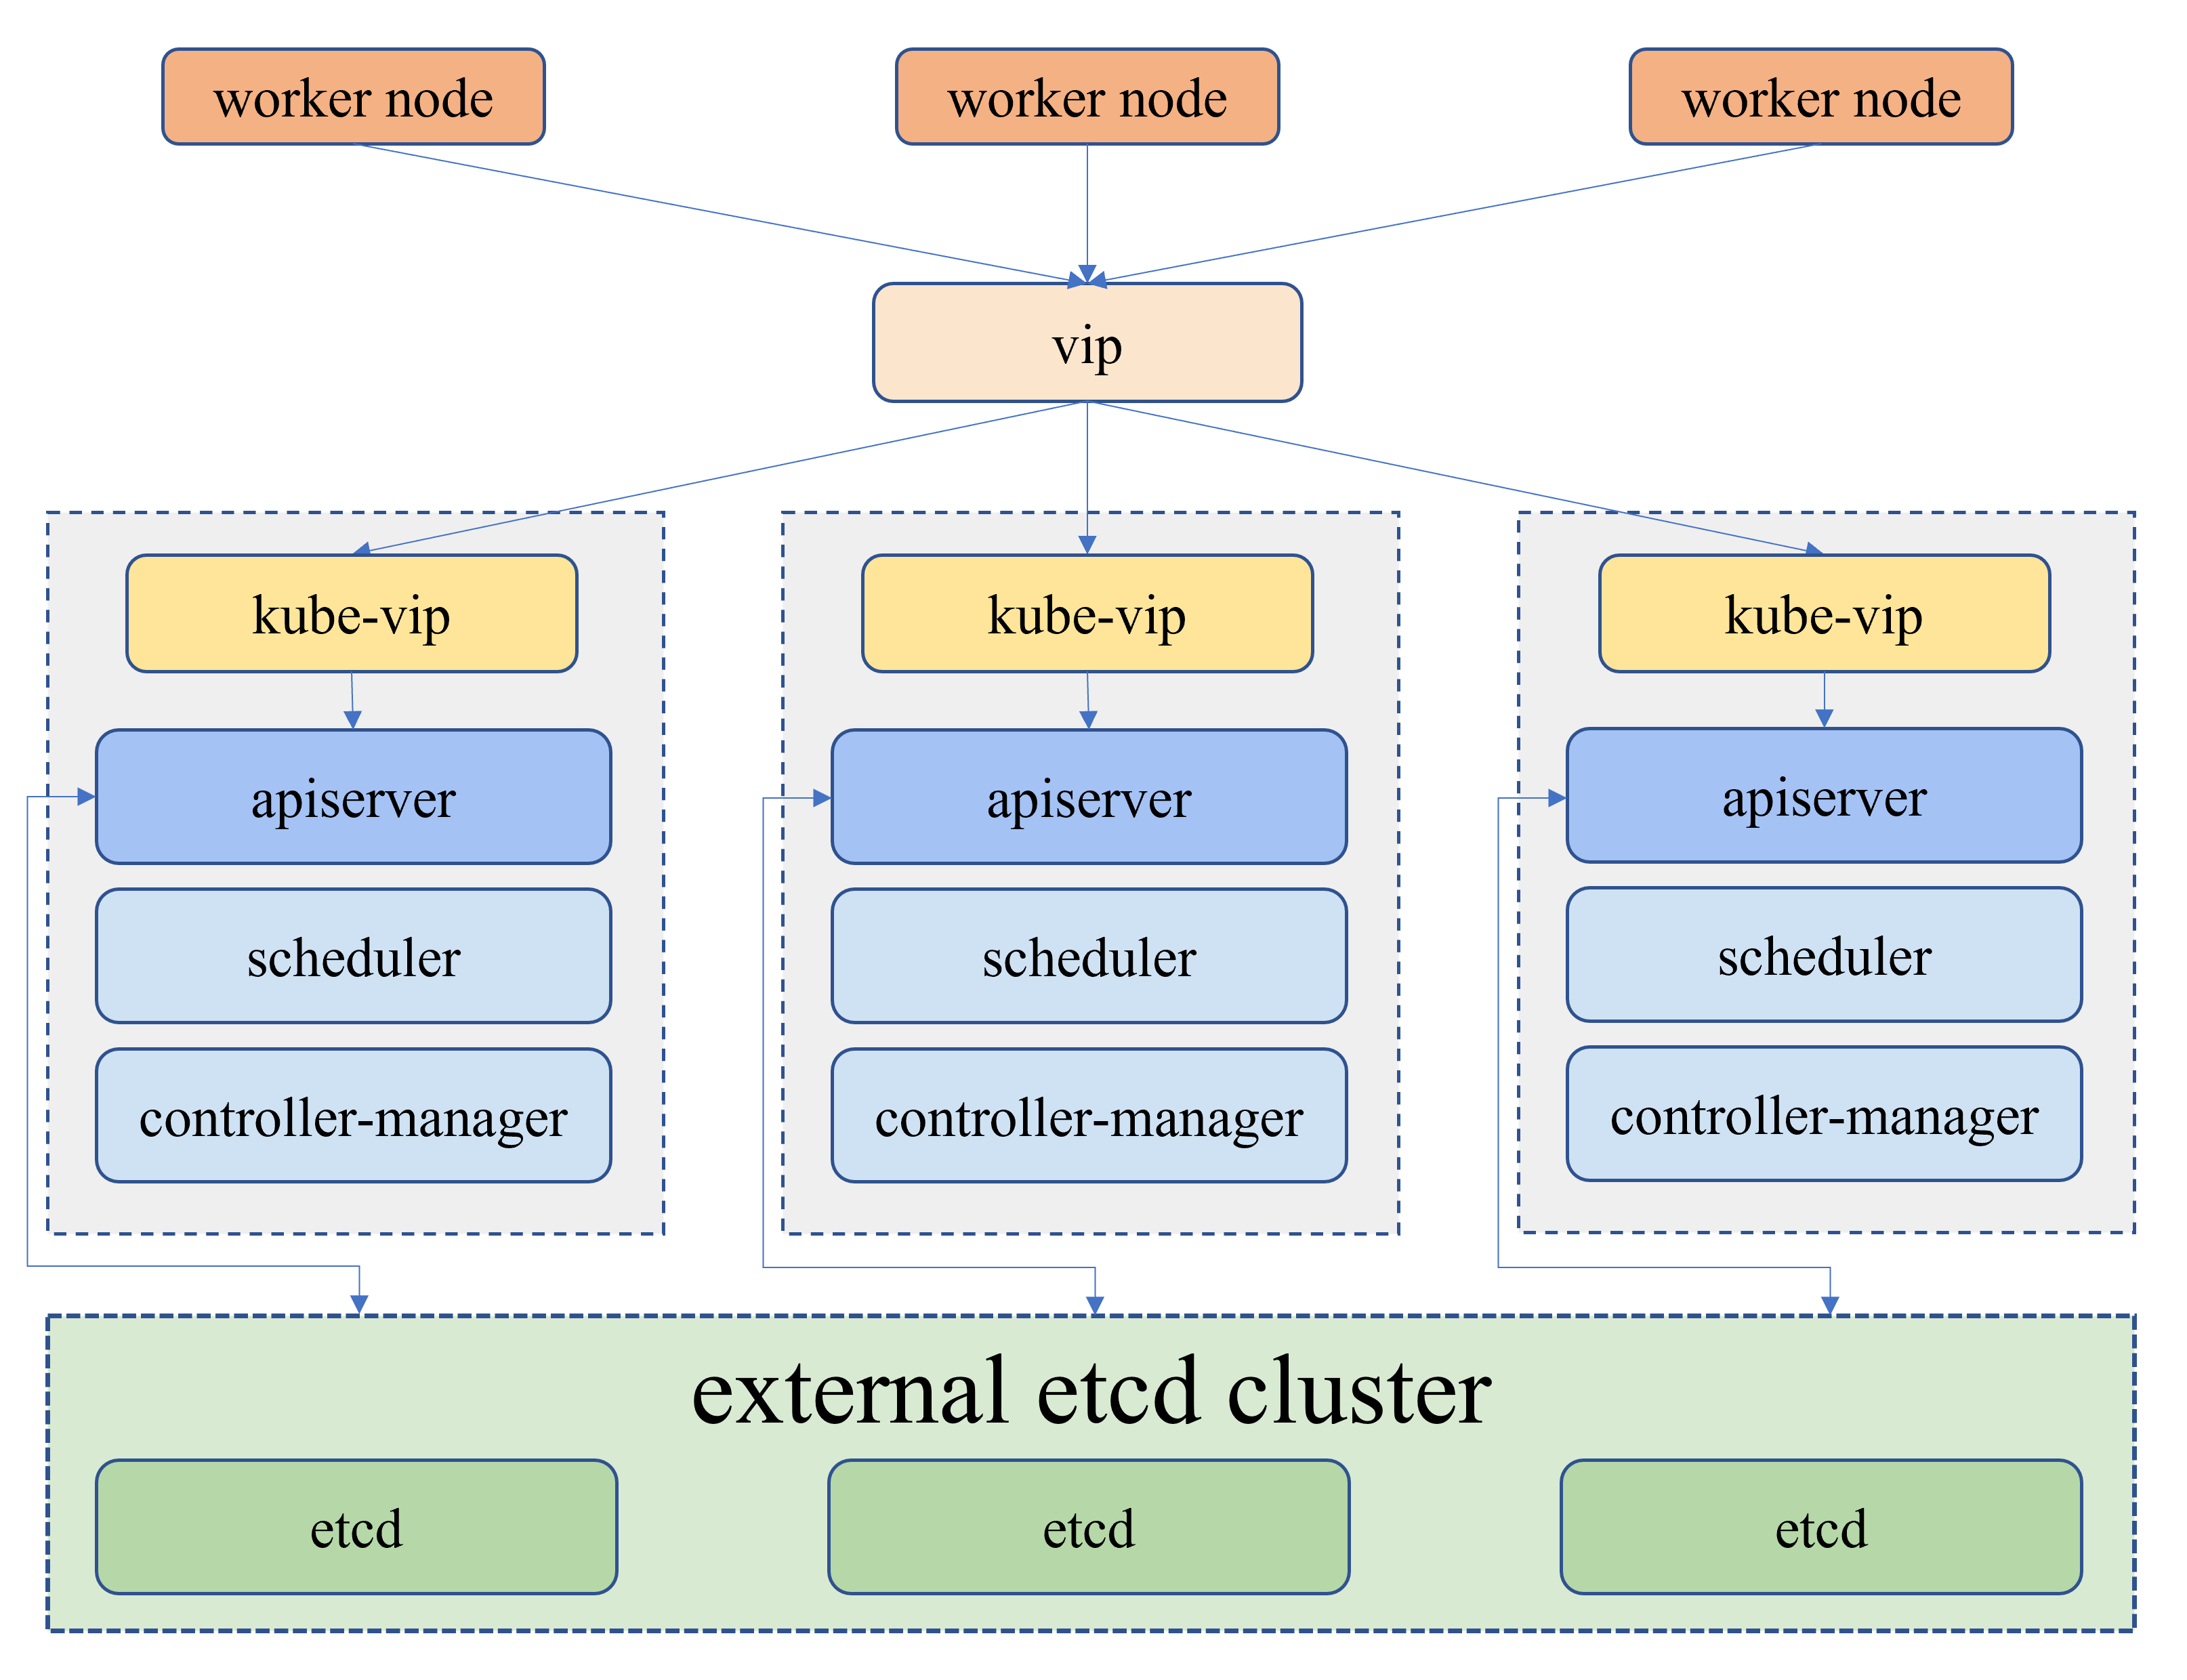
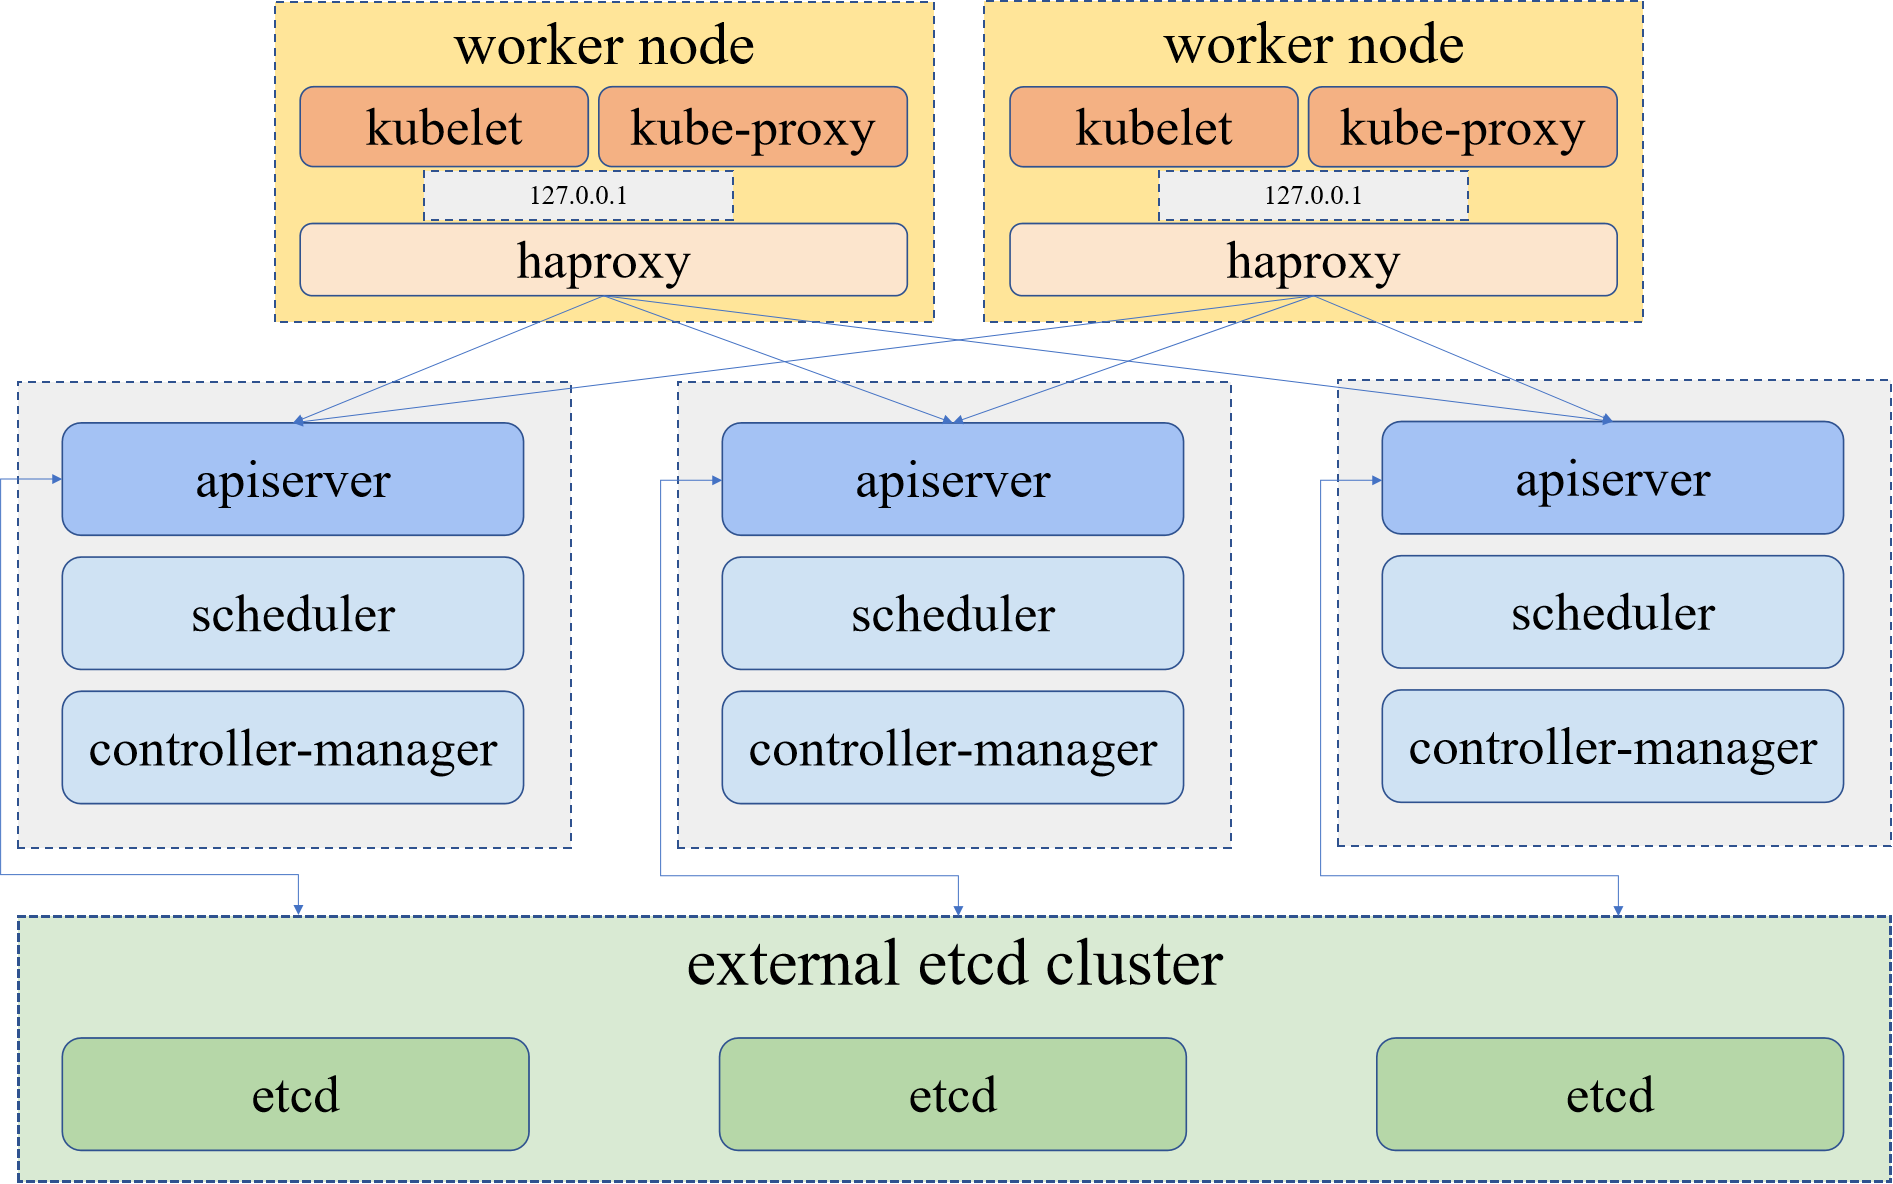
内部负载均衡就是每个 master 节点的 kubelet 连接本地的 kube-apiserver,每个 worker 节点的 kubelet 通过本地的反向代理连接 kube-apiserver。基于此,kubekey 将部署一个基于 haproxy 的代理,驻留在每个工作节点上作为本地反向代理。

2.2 主机规划
- 本次采用内部负载均衡的方式来搭建 Kubernetes 高可用集群,其中主机规划如下:
| 角色 | IP 地址 | 操作系统 | 配置 | hostname |
|---|---|---|---|---|
| master | 192.168.68.10 | CentOS 7.9 | 2核CPU,3G内存,50G硬盘 | k8s-master1 |
| master | 192.168.68.11 | CentOS 7.9 | 2核CPU,3G内存,50G硬盘 | k8s-master2 |
| master | 192.168.68.12 | CentOS 7.9 | 2核CPU,3G内存,50G硬盘 | k8s-master3 |
| node | 192.168.68.13 | CentOS 7.9 | 2核CPU,3G内存,50G硬盘 | k8s-node1 |
| node | 192.168.68.14 | CentOS 7.9 | 2核CPU,3G内存,50G硬盘 | k8s-node2 |
| node | 192.168.68.15 | CentOS 7.9 | 2核CPU,3G内存,50G硬盘 | k8s-node3 |
2.3 搭建步骤
- 准备工作(所有机器节点均需执行):
# 替换为国内镜像源
# 备份
cp -a /etc/yum.repos.d/CentOS-Base.repo /etc/yum.repos.d/CentOS-Base.repo.bak
# 下载
wget -O /etc/yum.repos.d/CentOS-Base.repo https://repo.huaweicloud.com/repository/conf/CentOS-7-reg.repo
# 安装 dnf 软件包管理器,清除缓存并重新构建缓存
yum -y install dnf \
    && dnf clean all \
    && dnf makecache


# 升级内核
# 在 CentOS 7.x 上启用 ELRepo 仓库
rpm --import https://www.elrepo.org/RPM-GPG-KEY-elrepo.org
rpm -Uvh https://www.elrepo.org/elrepo-release-7.0-4.el7.elrepo.noarch.rpm
# 安装长期支持内核版本
dnf -y --enablerepo=elrepo-kernel install kernel-lt
# 查看启动项
cat /etc/default/grub
# 修改配置
sed -i 's/^GRUB_DEFAULT=saved$/GRUB_DEFAULT=0/' /etc/default/grub
# 查看启动项
cat /etc/default/grub
# 重新创建内核配置
grub2-mkconfig -o /boot/grub2/grub.cfg
# 重启
reboot
# 查看当前系统的内核
uname -sr
# 关闭 SELinux
# 查看 SELinux 是否开启
getenforce
# 查看 SELinux 是否开启
cat /etc/selinux/config
# 永久关闭 SELinux ,需要重启
sed -i 's/enforcing/disabled/' /etc/selinux/config
# 关闭当前会话的 SELinux ,重启之后无效
setenforce 0
# 查看 SELinux 是否开启
cat /etc/selinux/config

# 关闭 swap 分区
# 查看 swap 分区是否存在
free -h
# 关闭当前会话的 swap ,重启之后无效
swapoff -a
# 永久关闭 swap ,需要重启
sed -ri 's/.*swap.*/#&/' /etc/fstab
# 查看 swap 分区是否存在
free -h
- 开启 ipvs:
# 执行如下脚本
cat > /etc/sysconfig/modules/ipvs.modules <<EOF
#!/bin/bash
modprobe -- ip_vs
modprobe -- ip_vs_rr
modprobe -- ip_vs_wrr
modprobe -- ip_vs_sh
modprobe -- nf_conntrack
EOF
# 授权、运行、检查是否加载
chmod 755 /etc/sysconfig/modules/ipvs.modules && bash /etc/sysconfig/modules/ipvs.modules
- 设置主机名:
- 主机名解析:
cat >> /etc/hosts << EOF
127.0.0.1   $(hostname)
192.168.68.10 k8s-master1
192.168.68.11 k8s-master2
192.168.68.12 k8s-master3
192.168.68.13 k8s-node1
192.168.68.14 k8s-node2
192.168.68.15 k8s-node3
EOF

- k8s-master1 节点下载 KubeKey :
# 先执行以下命令以确保从正确的区域下载 KubeKey
export KKZONE=cn
# 执行以下命令下载 KubeKey
curl -sfL https://get-kk.kubesphere.io | VERSION=v3.0.2 sh -
# 为 kk 添加可执行权限
chmod +x kk


- 创建 KubeKey 的配置文件:
- 修改 KubeKey 的配置文件:
apiVersion: kubekey.kubesphere.io/v1alpha2
kind: Cluster
metadata:
  name: sample
spec:
  hosts:
  - {name: k8s-master1, address: 192.168.68.10, internalAddress: 192.168.68.10, user: root, password: "123456"}
  - {name: k8s-master2, address: 192.168.68.11, internalAddress: 192.168.68.11, user: root, password: "123456"}
  - {name: k8s-master3, address: 192.168.68.12, internalAddress: 192.168.68.12, user: root, password: "123456"}
  - {name: k8s-node1, address: 192.168.68.13, internalAddress: 192.168.68.13, user: root, password: "123456"}
  - {name: k8s-node2, address: 192.168.68.14, internalAddress: 192.168.68.14, user: root, password: "123456"}
  - {name: k8s-node3, address: 192.168.68.15, internalAddress: 192.168.68.15, user: root, password: "123456"}
  roleGroups:
    etcd:
    - k8s-master1
    - k8s-master2
    - k8s-master3
    control-plane:
    - k8s-master1
    - k8s-master2
    - k8s-master3
    worker:
    - k8s-node1
    - k8s-node2
    - k8s-node3
  controlPlaneEndpoint:
    ## Internal loadbalancer for apiservers
    internalLoadbalancer: haproxy # 内部负载均衡,如果是外部负载均衡,将此句注释掉

    domain: lb.kubesphere.local
    address: "" # 外部负载均衡 vip 的地址
    port: 6443
  kubernetes:
    version: v1.21.10
    clusterName: cluster.local
    autoRenewCerts: true
    containerManager: docker
  etcd:
    type: kubekey
  network:
    plugin: calico
    kubePodsCIDR: 10.233.64.0/18
    kubeServiceCIDR: 10.233.0.0/18
    ## multus support. https://github.com/k8snetworkplumbingwg/multus-cni
    multusCNI:
      enabled: false
  registry:
    privateRegistry: ""
    namespaceOverride: ""
    registryMirrors: []
    insecureRegistries: []
  addons: []


---
apiVersion: installer.kubesphere.io/v1alpha1
kind: ClusterConfiguration
metadata:
  name: ks-installer
  namespace: kubesphere-system
  labels:
    version: v3.2.1
spec:
  persistence:
    storageClass: ""
  authentication:
    jwtSecret: ""
  zone: ""
  local_registry: ""
  namespace_override: ""
  # dev_tag: ""
  etcd:
    monitoring: true
    endpointIps: localhost
    port: 2379
    tlsEnable: true
  common:
    core:
      console:
        enableMultiLogin: true
        port: 30880
        type: NodePort
    # apiserver:
    #  resources: {}
    # controllerManager:
    #  resources: {}
    redis:
      enabled: false
      volumeSize: 2Gi
    openldap:
      enabled: false
      volumeSize: 2Gi
    minio:
      volumeSize: 20Gi
    monitoring:
      # type: external
      endpoint: http://prometheus-operated.kubesphere-monitoring-system.svc:9090
      GPUMonitoring:
        enabled: false
    gpu:
      kinds:
      - resourceName: "nvidia.com/gpu"
        resourceType: "GPU"
        default: true
    es:
      # master:
      #   volumeSize: 4Gi
      #   replicas: 1
      #   resources: {}
      # data:
      #   volumeSize: 20Gi
      #   replicas: 1
      #   resources: {}
      logMaxAge: 7
      elkPrefix: logstash
      basicAuth:
        enabled: false
        username: ""
        password: ""
      externalElasticsearchHost: ""
      externalElasticsearchPort: ""
  alerting:
    enabled: false
    # thanosruler:
    #   replicas: 1
    #   resources: {}
  auditing:
    enabled: false
    # operator:
    #   resources: {}
    # webhook:
    #   resources: {}
  devops:
    enabled: false
    jenkinsMemoryLim: 2Gi
    jenkinsMemoryReq: 1500Mi
    jenkinsVolumeSize: 8Gi
    jenkinsJavaOpts_Xms: 512m
    jenkinsJavaOpts_Xmx: 512m
    jenkinsJavaOpts_MaxRAM: 2g
  events:
    enabled: false
    # operator:
    #   resources: {}
    # exporter:
    #   resources: {}
    # ruler:
    #   enabled: true
    #   replicas: 2
    #   resources: {}
  logging:
    enabled: false
    containerruntime: docker
    logsidecar:
      enabled: true
      replicas: 2
      # resources: {}
  metrics_server:
    enabled: false
  monitoring:
    storageClass: ""
    # kube_rbac_proxy:
    #   resources: {}
    # kube_state_metrics:
    #   resources: {}
    # prometheus:
    #   replicas: 1
    #   volumeSize: 20Gi
    #   resources: {}
    #   operator:
    #     resources: {}
    #   adapter:
    #     resources: {}
    # node_exporter:
    #   resources: {}
    # alertmanager:
    #   replicas: 1
    #   resources: {}
    # notification_manager:
    #   resources: {}
    #   operator:
    #     resources: {}
    #   proxy:
    #     resources: {}
    gpu:
      nvidia_dcgm_exporter:
        enabled: false
        # resources: {}
  multicluster:
    clusterRole: none
  network:
    networkpolicy:
      enabled: false
    ippool:
      type: none
    topology:
      type: none
  openpitrix:
    store:
      enabled: false
  servicemesh:
    enabled: false
  kubeedge:
    enabled: false
    cloudCore:
      nodeSelector: {"node-role.kubernetes.io/worker": ""}
      tolerations: []
      cloudhubPort: "10000"
      cloudhubQuicPort: "10001"
      cloudhubHttpsPort: "10002"
      cloudstreamPort: "10003"
      tunnelPort: "10004"
      cloudHub:
        advertiseAddress:
          - ""
        nodeLimit: "100"
      service:
        cloudhubNodePort: "30000"
        cloudhubQuicNodePort: "30001"
        cloudhubHttpsNodePort: "30002"
        cloudstreamNodePort: "30003"
        tunnelNodePort: "30004"
    edgeWatcher:
      nodeSelector: {"node-role.kubernetes.io/worker": ""}
      tolerations: []
      edgeWatcherAgent:
        nodeSelector: {"node-role.kubernetes.io/worker": ""}
        tolerations: []


- 创建集群:
注意:安装成功之后,根据日志信息,通过浏览器登录到 kubesphere 平台即可。
- 安装成功的日志:
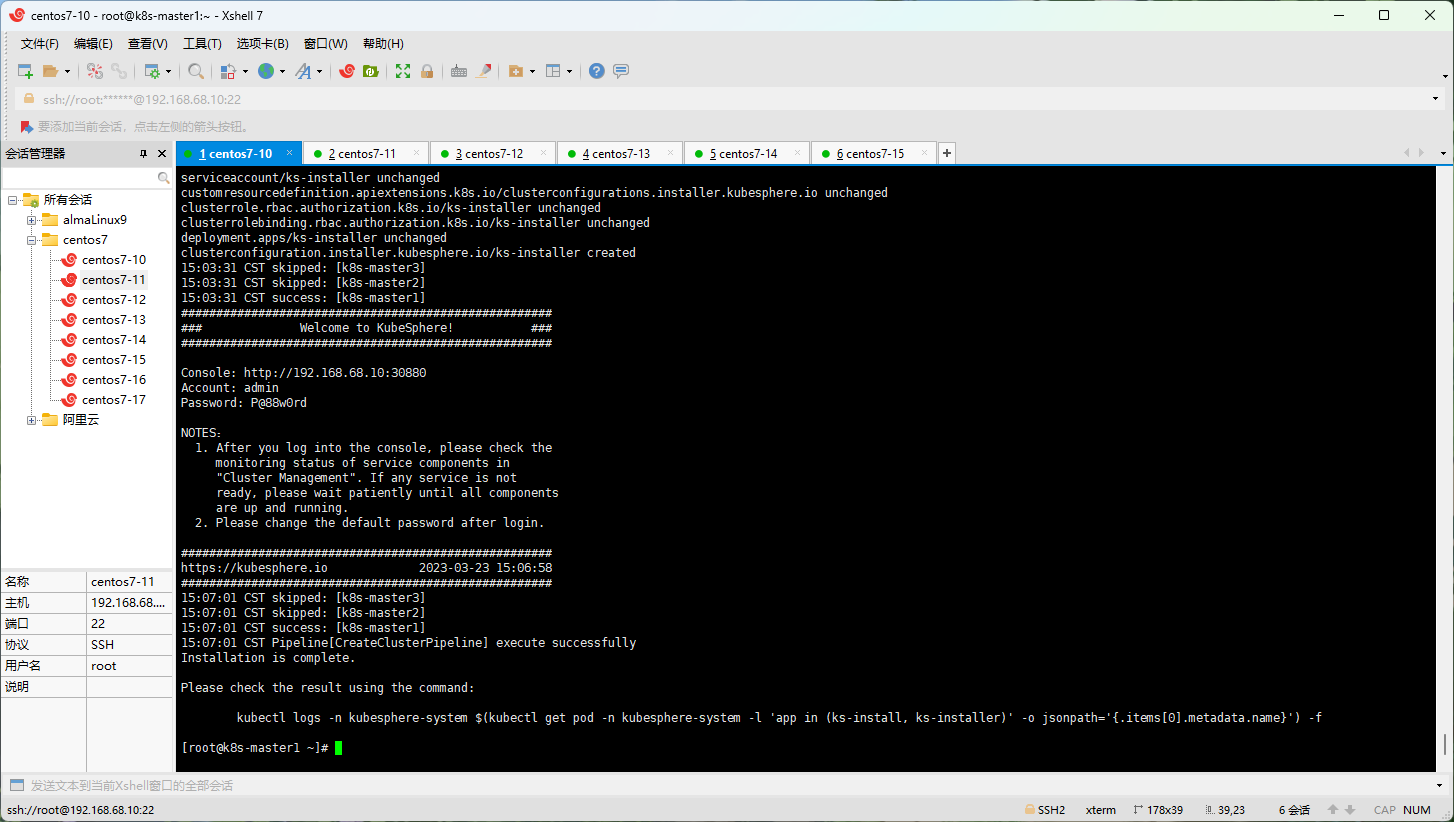
- 登录 kubesphere :

- 删除集群:
- 升级集群:
第三章:Kubernetes 增删集群节点
3.1 概述
- 在实际应用场景中,有的时候,我们需要根据实际情况,对 Kubernetes 进行增删节点,而 KubeKey 就提供了这种功能。
3.2 增加节点
- 步骤:
- ① 修改 config.yaml 文件,在其中配置要增加的节点。
- ② 执行
./kk add nodes -f config.yaml即可。 - ③ 登录到 kubesphere 平台查看节点即可。
注意:增加的节点同样要执行相应的准备工作,如:关闭防火墙,关闭 swap 分区等,此处就不再次阐述了!
- 示例:

3.3 删除节点
-
步骤:执行
./kk delete node <nodeName> -f config-sample.yaml即可。 -
示例:略。
第四章:Kubernetes 集群证书管理
5.1 概述
- 默认情况下,使用 kubeadm 安装 Kubernetes 集群的证书的有效期是 1 年,但是 KubeKey 能自动检测 Kubernetes 集群证书的有效期,我们也可以使用 KubeKey 来帮助我们延长 Kubernetes 集群证书的有效期。
5.2 Kubernetes 集群证书管理
- 查看集群证书的有效期:

- 手动更新证书有效期:

第六章:KubeSphere 启用可插拔组件
6.1 概述
- 默认情况下,KubeSphere 将一些组件做成可插拔,目的就是为了减轻对硬件的压力;当然,如果我们需要,可以手动开启。
6.2 启用可插拔组件
- ① 通过 admin 账户登录到 KubeSphere 平台:略。
- ②
平台管理-->集群管理-->CRD--> 输入ClusterConfiguration--> 编辑ks-installer即可。

第七章:Kubernetes 节点管理
-
可以通过 KubeSphere 对 Kubernetes 的节点做一些操作,如:打标签,设置污点、停止调度等。
-
示例:

更新: 2023-03-24 02:07:05
原文: https://www.yuque.com/fairy-era/yg511q/iwtm32krf5g55sl4